Showing posts with label fun stuff. Show all posts

Saturday, August 17, 2024

Honse

I start teaching in a week so I've been prepping and flexing my art muscles by drawing* this magnificent honse! What a beauty! A+++

*Let's be honest...this is a procrastination sketch. I needed a break from typing up Syllabi and Schedules. :)

Thursday, July 18, 2024

July 18 2024

From my sketchbook...been busy working on art for a gallery show I want to enter later on this year. I'm still messing around with the Uniball/Speedball ink combo I mentioned in my last post. I like the method, but I'm waiting now for coupons to drop so I can pick up some waterproof brown ink to experiment with. The colors may be a little more lively if there's a warmth to the values versus pure black.

I was impressed by the organized chaos of my desk post-art frenzy so I took a pic to memorialize it. Things to note...the yellow little pot is a ceramic yogurt container I picked up at Sprouts. That tiny jar of yogurt was three whole American bucks (!) and tasted okay, but I was more interested in using that cute container for watercolor than the probiotics inside. I've also been obsessed watching/listening to Campaign 3 of Critical Role. I started from the beginning earlier this year and am up to episode 60 now. I'm also watching the Thursday livestream each week too. It's sort of weird consuming the story at two different points in time, but the lore is so heavy it helps to watch/rewatch things as they progress.

Thursday, July 04, 2024

Experiments with ink

I was browsing through books at Art Supply Warehouse and ran across Everyday Sketching & Drawing by Steven B. Reddy.

The art was really appealing I already owned most of the supplies* so I tried Reddy's process out using reference from Line of Action. I lightly sketched in big shapes with pencil, drew in lines using a Uniball Vision pen (it's waterproof!), painted in values using Speedball Super Black ink (it's waterproof when dry!), glazed watercolors on top of that, and then used a little bit of white gouache to pop in some light. This was a fun study! I also really like the recommendation of the Uniball pens. They aren't too expensive and the ink flows well on rough paper.

*I have enough art supplies at home to open my own art store. Seriously...you should see my pen collection, I got a gabillion of them stored in various mugs and Talenti gelato cups.

Bonus pic! This is also from Line of Action. I didn't want to add color on top of these values. One of the drawbacks of layering on top of black is that bright colors would get muddy with this method. It works for the donkey above because there was a lot of gray in the reference. Not so much with the green grass this kitty is lounging on top of.

Sunday, October 04, 2015

Famous Cat Show

I was invited to participate in the Famous Cat Show at Fan*Alley.  I love black cats so I chose to depict the infamous Princess Monster Truck as her most fabulous self.  I even used gold ink to give my watercolors some extra pizzazz!

I created artwork in the gallery as part of the opening night festivities.  Here's the setup of my station.  I drew sketches and made personalized blob paintings of kitties!  I had so much fun, its was awesome meeting all the folks who came out to see the show.

Here's a sampling of the blob paintings I made...

Thursday, October 01, 2015

FemFiciton Zine

I'm part of a ladies-only group that meets once a month to create a zine called FemFiciton.  Below is the artwork I've drawn for the first three issues:

This was my submission for Volume #1.  I drew my Tough Girl on a field of battle.  (BTW the original drawing has been sold, I do have prints available-email me if you want one!)

On the left is our first published issue!  I drew the cover for Volume #1!  On the right is my submission for V.2-dragons and roller derby...

Last but not least, this is my artwork for Volume #3.  I had an idea about an Mayan-inspired dragon I HAD to get out my head.  Luckily the idea turned into a nifty ink drawing!

Friday, January 17, 2014

Lookie Here!

Look what I found at Barnes and Noble!  My art in a book!  I totally regret not autographing that page when I had a chance.  That book's value would have instantly increased by hundred of thousands of dollars! Yeah right....dream on Barbara. :P

Wednesday, October 16, 2013

Inktober Book #1

I've been participating in Inktober by inking a small piece on bristol board everyday.  Keeping the upcoming Halloween in mind I drew monsters and creatures and odd-looking things.  I collected the 17 drawings I've inked so far and assembled them into an accordion fold book with a matching slipcover.

Tuesday, September 24, 2013

Happy Kitty

This very happy kitty was drawn on Vellum Bristol board with a Derwent drawing pencil, toned with an ink wash, and colored in Photoshop.

Tuesday, July 09, 2013

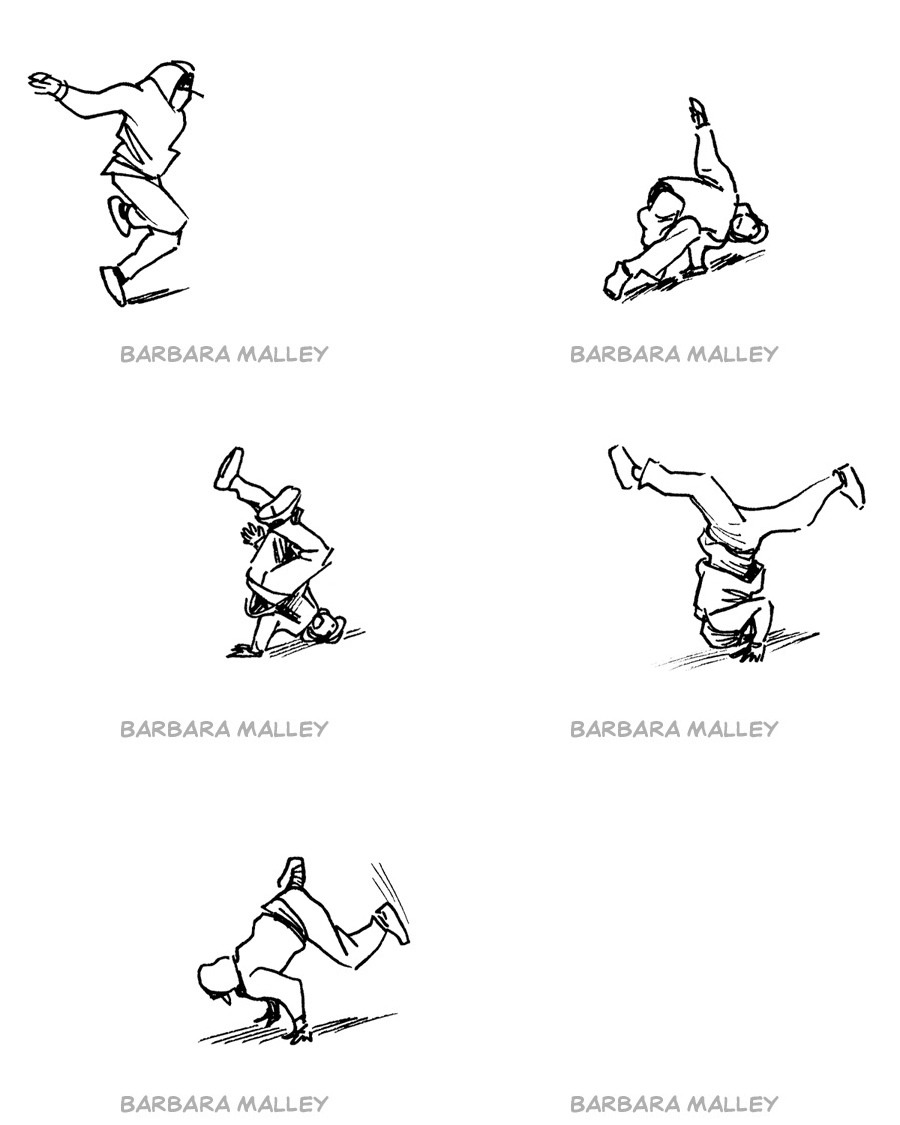
Breakdancer Sequence

I was browsing videos on YouTube yesterday when this one caught my eye.  I picked the segment starting at 1:17 to sketch because I liked the silhouette of the dancer and the sequence was short enough that I could fit almost all of the frames onto one sketchbook page.  Each individual sketch was drawn by an 08 Micron and took 1-2 minutes to complete.

For fun I created an animated gif to test the flow of the gesture drawings.  Overall I'm pretty stoked on how everything turned out!  I want make some more of these!!!

Thursday, October 11, 2012

Saint Alia of the Knife-Process

While I was backing up my computer I rediscovered the process pics I took in 2011 while making a small figure of Saint Alia of the Knife. She is a powerful girl first introduced in the novel Dune by Frank Herbert. Alia was born fully aware and is the younger sister of Maud'Dib, the "savior" and self-imposed ruler of spacefaring humankind. There is a lot more to this character so go read the entire series of books-they're recommended!

This is the step-by-step process I used to create this piece:

STEP ONE- Gathering Materials
I didn't sketch anything in advance for Alia, this project was only for fun so I let serendipity sort of dictate how the figure was going to look in the end.  I knew I wanted something similar to her David Lynch movie look so I gathered a palette of blacks/greens (the colors of House Atreides) and other odd bits and ends that might come in handy as I dressed the figure later on.
These are the materials I ended up using:
Paperclay, translucent sculpey, craft styrofoam, heavy gage wire, a selection of pre-mixed craft paints, black fabric, a scrap piece of furniture fabric, a scrap piece of leather, a rock, doll hair, thread, two glass beads, seed beads, matte medium, and super glue.

STEP TWO - Making the Support Structure for the Figure
I thought the rock I used for the base looked like something Alia might stand high upon to survey the desert.  Based on that notion I cut the heavy gage wire to make a stick figure with childlike proportions.  I then took small chunks of styrofoam and super glued those to the wire to bulk out the form.  Once that was done I bent and twisted the support into a pose I liked and marked the two areas on the rock where I would eventually glue the finished figure.

STEP THREE - Sculpting the Figure
To sculpt Alia's body I added paperclay directly onto the support, there's no need to add glue or wrap a smaller gage wire to provide grip. When I had a rough approximation of the face I pushed in two blue glass beads for her eyes (because she is a spice addict) and added paperclay on top to create the eyelids. After I finished the basic form I used a potter's needle and loops to add in the fine details. It took about 24 hours for the figure to fully dry. In the pic below I've already started to add color into the face. Also at the bottom of the pic in front of the mechanical pencil is Alia's crysknife made out of translucent scupley and "aged" with craft paint.

STEP FOUR - Painting the Figure
I used a selection of craft paints to paint Alia.  I wasn't sure where I was going to glue in her fabric robes so I decided to paint the entire figure. Better to do that then try and remix colors if I missed a spot. I painted an Atreides Hawk on her right shoulder and a stylized "A" on her left. Because she was in a dessert I added dustiness to her boots that matched the color of the rock. I wanted to make sure it looked like her and the rock were from the same environment.

STEP FIVE - Glueing on the Details
To finish the figure I super glued black fabric that was stiffened with matte medium onto the body to create Alia's robes, a scrap piece of leather and furniture fabric for her belt, thread and seed beads for her lasso, and braided doll hair. Once the costume was complete I went back and made a final pass with craft paint to blend all the elements together.  The finished figure is approximately 5" high and 2-1/2" wide from front-to-back.

Saint Alia of the Knife was entered in the 2011 Crafts Competition at the OC Fair.  I ended up winning Second place in my division-not bad for a little project I did for fun.

Friday, August 31, 2012

Thumbnail Mini Comic

This 2"x3" minicomic was made from thumbnails I drew in my sketchbook with an 02 Micron.  I photocopied the sketches at 125%, cut out each page with a blade, and then assembled the comic by gluing the thumbnails into a simple book I made out of Xerox paper and a staple.  The above pic shows the front and back covers (upper left) and 3 interior spreads.

Why did I do this?  I'm planning on self-publishing this comic in installments and I wanted to double-check layouts and page turns before I started inking issue #1.

Bonus sketch: This is Sibley, the star of the aforementioned comic drawn with an 05 Micron and red Tombo marker.  She is holding Tengu, her beloved pet and companion.

Tuesday, May 01, 2012

My First Volvelle

A volvelle is a type of paper structure that has a rotatable part.  In my pic the gear shape under the chin is swiveled either up or down to make the word MEOW appear in the cat's mouth.  This was made with cardstock, glue, Micron pens, Tombo markers, and white ink.  It measures 2-3/8" x 2-1/4".

P.S. Forgive the wonky focus of this pic.  My camera didn't want to cooperate with me tonight.

Saturday, April 21, 2012

Sketches from 2001: A Space Odyssey

*click the image above to enlarge*

I love 2001.  I sat down with the DVD (checked out from my local library for free!) and sketched stills I thought were setup in an intriguing way.  Everything was drawn with an 05 Micron, black Pentel felt tip, and gray Tombo marker.

A couple of thoughts: I saw that the shape of the monolith was hidden in scenes throughout the movie.  Sketch #8 shows how the shape of a background pillar sort of symbolically becomes the monolith watching the meeting of the US scientists.  Also in Sketch #23 Old Bowman reaches up towards the top of the frame.  The black shape of the letterbox becomes the monolith-that is so clever!  It also echoes the other scenes in the movie where an ape or Dr. Floyd touch the monolith.

I also have to mention I cued up Pink Floyd's "Echoes" with the last section of the movie "Jupiter and Beyond the Infinite." It is so damn awesome how the music and the visuals sync up especially with the last appearance of the monolith in front of old Bowman's bed.  I totally geek out everytime I do that. :)

Thursday, February 16, 2012

Penguins

 
Laura Hoffman and I were brainstorming ideas for a project of hers yesterday.  The above Painter sketches I drew are the best two that came out of that creative session.

Saturday, February 11, 2012

Inking Process

Here's some pics of my inking process for a piece I did for a gallery show.
 
These are the pencils of the main character, a woman in a steampunk outfit.  Since I was going to place a second character in the black silhouette of her outfit, I concentrated on creating interesting shapes in the outline of her clothes and in the swirls of her hair.

Once I combined the the pencils of the two characters (image missing) I scanned that into Photoshop and quickly threw in the blacks to double-check everything was in the right spot.

After I made some minor corrections to the pencils, I taped the them to a light box and then placed a 11" x 14" sheet of Vellum bristol board on top of that.  I inked the piece using a Hunt School 56 nib and Speedball Super Black.  It took me a couple of hours-I remember watching the last two periods of a NHL game during this part.

Once the linework was dry I scanned that into the computer.  In Photoshop I made some slight corrections, filled the blacks, and added a spot color.  The final image is digital.

After I submitted the digital file for the show I went back and finished the inks by filling the blacks in with a brush and making small corrections with a 005 Micron pen.  This can be a time consuming process so I usually do this after the deadline so I can sell the inks at a later point.  (Note: In the photo the inks look uneven because the camera flash is bouncing off of them.)

I'll post a link to the final image once I hear that my piece has been accepted.
2/22/12 EDIT: Good news!  I was accepted to the show.  Here's a link to the finished piece.
3/2013 EDIT: The catalog of the show is now up on Amazon.

Monday, April 25, 2011

Painter

I spent the weekend doing speed painting exercises trying to sharpen both my painting and Painter skills. This was my fav of the bunch I did. I got a couple more posted over here.


This profile started as a speed painting but I took it to finish. I like the way it came out, it makes me nostalgic for the summer I spent at Knott's working as a portrait artist in Ghost Town/Fiesta Village. :)

P.S. Original images for all the exercises were random Google finds.

Friday, April 08, 2011

Speed Paint

This is a detail of a speed paint I did in Painter based off a photo of a woman in a steampunk costume. I spent 45 minutes on the original image and then cropped it to this size and spent another 20 tightening up some details. The main brushes I used where the Opaque Acrylic and Simple Water.

This pic looks lousy as a small thumbnail. Click on it to get to get the full view.

Wednesday, February 16, 2011

Rainy Day Crafts!

I stayed indoors yesterday and got all crafty with paperclay. This is the first time I've used and I really like it.

Paperclay is pretty forgiving even after its dried. I was able to use a wet paintbrush to smooth out the odd dents and dings. I also used foam and toothpicks as armature and the clay had no problems adhering to that. As soon as my little harpy totally dries I'm going to paint her in purples, grays, and greens like a rock pigeon.

3/6 EDIT: The harpy is done! I'll post pics with a link soon.

Monday, February 07, 2011

Happy Chinese New Year

Its the Year of the Rabbit-how could I pass up the chance to draw a bunny.

P.S. I hope I wrote the Chinese characters right. I blame Google if they're wrong. :P

Sunday, April 05, 2009

Cat Card


Drawn in colored ink on 140LB Cold-Press Watercolor paper.

This is birthday card I made for my Dad of my parent's cats. It's a family in-joke that Scooter (21+ pounds) will one day eat HappyKitty (7 pounds).